Let’s set up my personal blog#
As the time draws closer to midnight and a new year sets upon us, perhaps I should fulfil my New Year’s resolution for 2025… starting a blog.
I have never really been one for words or for regularity, structure, or sanity with my personal projects. Normally I find something interesting, play around, and break things until I get the outcome I would like.
When looking into how I wanted to set up a blog I was overwhelmed with many different solutions. Should I install a full CMS such as Ghost or WordPress using a VPS, web server and database, or should I keep it simple and run it as a static site (one less thing to manage day to day)?
I settled on a static site, and since I am using GitHub to host this website we can use a neat feature on a public repository to have a free hosted static website.
Let’s begin…
Reviewing static frameworks, I tossed up between Jekyll and Hugo. Both have great offerings for themes, however the Hugo theme Blowfish with its extreme customisation out of the box took my pick.
I will be setting up the website on a laptop running Pop!_OS Linux, however the instructions are very simple to follow for Windows, Mac, and Linux.
Head over to the Hugo GitHub Release page so we can get the most up‑to‑date version.
The current version on GitHub is v0.153, however the APT repository is v0.97, which is not compatible with the new version of the Blowfish theme I will use. Your mileage may vary please make sure to review the requirements of your theme you select.
For Debian‑based systems download the hugo_X.X.X_linux-amd64.deb file and once downloaded run the following:
sudo dpkg -i hugo_X.XXX.X_linux-amd64.debWe can how confirm Hugo is installed, we will be presented with the version number:
hugo version
hugo v0.153.5-1f2de189edc4e16ff3b51c299247628fecbe53e7 linux/amd64 BuildDate=2025-12-30T10:27:17Z VendorInfo=gohugoio
Now let’s create our first site
hugo new site richardburgoyne-comSo for a theme I selected Blowfish, this for no particualr reason at this stage, I suspect over time and reviewing themes I may change, and with Hugo it is made very easy.
To install the theme there is a couple of different methods, a custom blowfish installation tool, a manual copy or a git sub module which we will use for this install.
Jump into the directory or your newly created site, initialise git and add in the sub module for Blowfish:
cd richardburgoyne-com
git init
git submodule add -b main https://github.com/nunocoracao/blowfish.git themes/blowfish
Copy the directory /themes/config/ (including sub folders) to the root directory, then locate and delete the Hugo.toml file.
This step is importaint to make sure the configuration files we previously copied work and apply all of their settings.
Ok now to configure our theme head over to /config/hugo.toml you will need to uncomment the theme and set your base URL:
theme = "blowfish"
baseURL = "https://richardburgoyne.com/"
We can now go to languages.en.toml file and update the site Title, Params and Params.Author to reflect the values we would set, to keep my logo the same across the board I have linked my Github Avatar.
title = "Richard Burgoyne"

[params]
  displayName = "EN"
  isoCode = "en"
  rtl = false
  dateFormat = "2 January 2006"
  logo = "https://avatars.githubusercontent.com/u/200693696?v=4"
  secondaryLogo = "https://avatars.githubusercontent.com/u/200693696?v=4"

[params.author]
  name = "Richard Burgoyne"
  email = "hello@richardburgoyne.com"
  image = "https://avatars.githubusercontent.com/u/200693696?v=4"
  imageQuality = 96
  links = [
    { email = "mailto:hello@richardburgoyne.com" },
    { linkedin = "https://www.linkedin.com/in/richard-burgoyne/" },
   ]
The last little bit on configuration I did was in the params.toml file I have defaulted the website to dark mode and have picked the ocean theme, a list of themes for Blowfish can be found here
colorScheme = "ocean"
defaultAppearance = "dark" # valid options: light or dark
autoSwitchAppearance = true
To preview our website, the Hugo package we installed earlier has a backend server for us to spin up and review our code. I have included two flags: --disableFastRender for better performance and --noHTTPCache to make sure we are seeing live changes and not a cached version:
hugo server --disableFastRender --noHTTPCache

                  │ EN
──────────────────┼────
 Pages            │ 16
 Paginator pages  │  0
 Non-page files   │  0
 Static files     │  7
 Processed images │  3
 Aliases          │  0
 Cleaned          │  0

Built in 22 ms
Environment: "development"
Serving pages from disk
Web Server is available at http://localhost:1313/ (bind address 127.0.0.1)
Press Ctrl+C to stop
When you make a change you will see that Hugo automatically rebuilds the preview for you, so there is no requirement to re-run the server command.
Change detected, rebuilding site (#1).
2025-12-31 21:07:49.222 +1100
Source changed /hugo-install-and-setup.md
Web Server is available at http://localhost:1313/ (bind address 127.0.0.1)
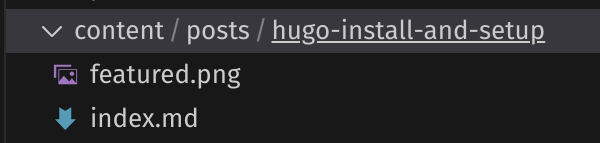
Total in 13 msSo let’s make some content. All of your posts will live under the /content directory. It pays to structure this in a way that makes sense for you and how your content is categorised. For me, I will be placing posts under a /content/posts directory.
Each post will be a directory name containing a featured.png, which will be the display image for the post, and an index.md, which will contain the Markdown and content for the post. If you have never used Markdown before, the Markdownguide is a great place to get started: https://www.markdownguide.org/
You can see the code for this post by going to the repo to get some inspiration
And this is just the beginning, there is so much customisation you can do with the Blowfish theme that we could be here all day. I would suggest taking a look at the possibilities, and over time I will slowly update this post’s format with the new things I learn to continue refining the blog.
If you are interestead in deploy your static Hugo site on Github pages follow this link to Hugo’s documenation for a step by step guide.
Thank you for taking the time to read this first post, and I hope it helped or inspired you to start your own blog, hopefully not last minute before New Year’s Eve like me.